What is Power BI Deployment Pipeline?
What is Power BI?
Human beings are sensory creatures by birth. We tend to process complex data and information in an easier manner if it were to be made visually appealing. Data Visualization has completely changed the game of how we view and comprehend large amounts of data.
Visualization of data has not only helped us understand information clearly but has also allowed us to communicate our ideas with anyone else in an easier manner.
One such Data Visualization tool is the Power BI. From clean and detailed visualizations to interactive and intuitive dashboards, Power BI is the absolute need of the hour. Primarily a business analytics tool provided by Microsoft, Power BI is aimed at creating a user-friendly interface which not only allows us to connect our data together, but it also helps us convert mundane information into high performance visuals, while having a security management system within the tool. Business Intelligence tool like Power BI has redefined decision making and is the ultimate one-stop shop for business analysts all over.
Deployment Pipelines by Power BI
With the constant need to develop the Power BI software to make it more accessible and reliable for end users, BI creators need to come together and collaborate often to make these changes happen in the collection of apps and connectors. This is where the need for Deployment Pipelines tool comes in. This tool allows BI creators to manage and maintain the lifestyle of the organizational content.
Before content such as reports, datasets and dashboards get consumed by the users, creators use Deployment Pipelines tool to develop and test out the Power BI information.
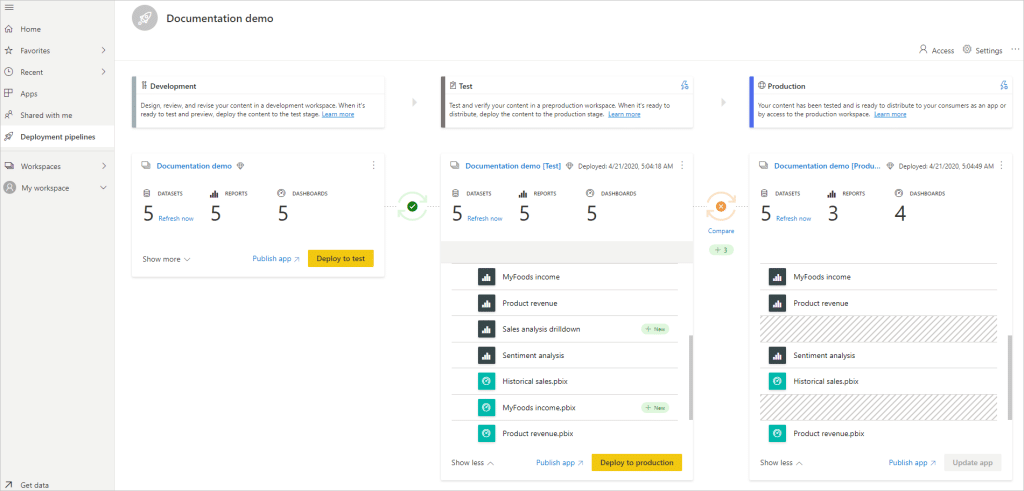
There are usually three stages in the process of design of the pipeline, namely, Development, Test and Production.
Stages of Design of Pipeline
- Development: This is the first stage in the design process of the pipeline. In this stage, the creators develop, build and upload new content with other creators.
- Test: You enter this stage once you’ve made the necessary changes to the new content in the Development stage. In the Test stage, the modified content is shared with reviewers or testers. You are able to run tests and preview the app as to how it will look for the end users.
- Production: Once the testing part is done with, the final content is sent over to the analysts all over the organization.
Steps in the Deployment Process
There are a total of five steps in the Deployment process of the Power BI tool. The steps are as follows:
- Creating a Deployment Pipeline
- Assigning a workspace to a deployment pipeline
- Deploying to an empty stage
- Creating dataset rules
- Deploying content from one stage to another
First Step- Creating a Deployment Pipeline:
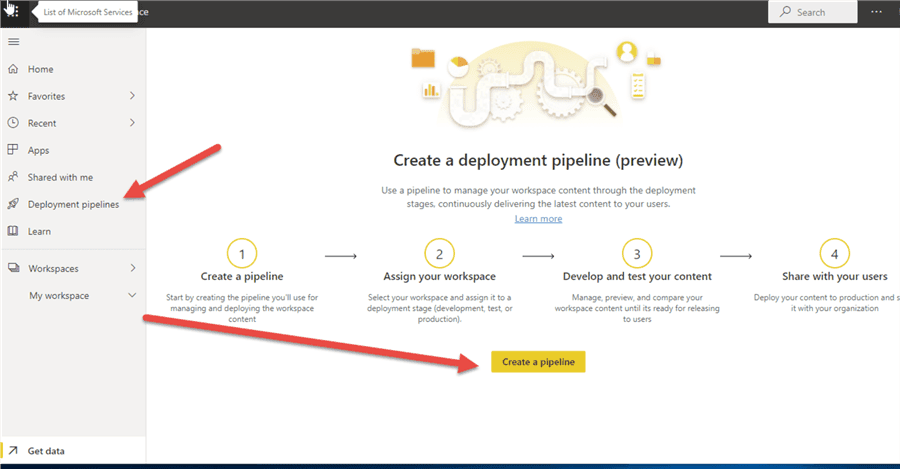
There are two ways to create a pipeline. One is from the deployment pipeline tab and the other is from a workspace. Once you create the pipeline, you can share it with others, enabling them to have full access to it. By access what it means is that, they can edit, delete, modify and view the said pipeline.
Creating a deployment pipeline is made easy by clicking on the Deployment pipelines option from the navigation pane, proceeded by clicking on Create pipeline. Continue creating by entering a name and description for the pipeline before pressing “Create”.
In order to create the pipeline from workspace, click on “Create a pipeline”, proceeded by entering the name and description for the pipeline in the dialog box, before proceeding to clicking on “Create”.
Second Step- Assigning a Workspace to a Deployment Pipeline
Once the pipeline is created, adding the content becomes necessary. This can be done by allocating a workspace to any stage.
Allocating a workspace can be made easy by clicking on Assign a workspace from the recently created pipeline.
There are certain limitations in assigning the workspace such as the fact that you are required to be an admin of the workspace, and the workshop must not be assigned to any other pipeline.
Third Step- Deploying to an empty stage
If you are an admin in the source workspace, you can deploy content to any stage that doesn’t contain content or an empty stage. The relationships are kept while deploying content to an empty stage.
To deploy all the content, select the stage to deploy from, proceeded by selecting the deployment button. This ensures that a duplicate workspace is created which contains all the existing content.
In order to only deploy certain items, click on the “Show more” link, and proceed to choose the items which you wish to deploy the next stage.
Fourth Step- Creating dataset rules
When content is deployed between various pipeline stages, creating a certain set of dataset rules allows you to modify or edit content in some places while keeping certain settings intact, without change.
There are certain limitations to creating dataset rules. For example, you need to be the owner to create the dataset rule, and the rules cannot be created in the development stage.
Fifth Step- Deploying content from one stage to another
When there is existing content in the pipeline stage, you can proceed to deploy it to the stage thereafter. This is done once all the actions have been performed in the pipeline. The usual process is going from development stage to the test stage and finally to the production stage. The last deployment time can also be seen while reviewing the stages. This also comes useful when you wish to see the last time the stage was updated or modified.
Comparing the stages
Data is compared when to stages next in sequence have content. The comparison does not include comparing between data or the refresh time.
There is a comparison indicator which appears each time you try to compare between two stages. If the indicator is green in colour, it shows that the data or content is the same. If it’s orange, it signifies that there has been a modification at a point.
Overriding the content
The content once deployed gets overwritten in the target stage. Once you select deploy, a list is show, showcasing the items that will be overwritten.

